| Shelf | Level | Time | Hook | Yarn |
|---|---|---|---|---|
| Odds and ends | Intermediate | 8-12 Hours | 5.5 mm | Chunky (Size 4 Acrylic) |
Chunky Crochet Turtleneck Sweater Pattern for Fall
Cozy up in this chunky crochet turtleneck sweater pattern featuring granny stitch sleeves, a ribbed collar, and easy panel construction for fall.
01 · The pieceWhat Chunky Crochet Turtleneck Sweater Pattern for Fall actually is
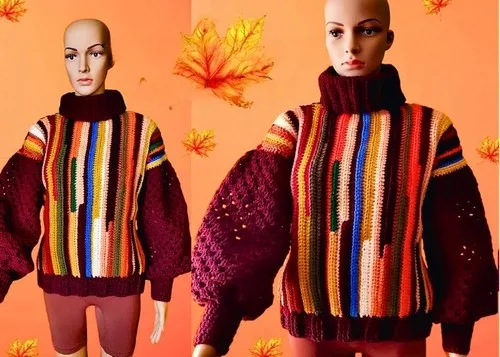
This chunky crochet turtleneck sweater is built from two simple rectangular body panels worked in back-loop-only half double crochet, giving it that soft, ribbed-knit look everyone loves without any actual knitting needles. The granny stitch sleeves and cozy ribbed turtleneck collar add texture and warmth exactly where you want it. It's perfect for crocheters who want a wearable, everyday piece that still feels like a fun weekend project rather than a marathon garment.
You'll lean on foundation chains, HDC-BLO ridging for the body panels, DC cluster granny stitch for the sleeves, and post stitches (FPDC/BPDC) plus decrease rounds for the ribbed cuffs and collar. It's an intermediate-friendly build — nothing too tricky, but you should be comfortable reading rounds, changing colors cleanly, and seaming pieces together. Expect to spend several relaxed evenings on it, since the panels and sleeves are worked flat then joined at the end.
The finished sweater lands around 21 inches wide by 20 inches long per body panel, with sleeves worked to about 14 inches and a snug 4-round turtleneck collar for warmth. It has a relaxed, oversized silhouette with visible ridged texture from the BLO rows and a bold granny-stitch sleeve that makes it feel handmade in the best way. Cozy, substantial, and full of character, it also makes a genuinely thoughtful handmade gift for the fall and winter months.
- Seam the two body panels together along both sides, leaving an 8-inch gap open for each armhole.
- Work the granny stitch sleeves in the round directly from each armhole opening until they reach the target length.
- Finish each sleeve with a ribbed cuff, decreasing gradually before working a few final rows for a snug fit.
- Sew the shoulder seams partway across each side, leaving the center open to form the neckline.
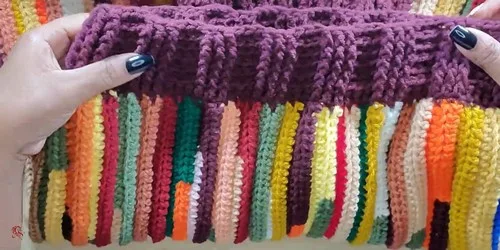
- Crochet the turtleneck collar separately and seam its rib ends together into a closed loop.
- Attach the finished turtleneck around the neckline opening for a cozy, fitted collar.
- Add the bottom brim along the lower edge of the joined body panels to complete the hem.
02 · The count run17 rounds across 5 parts, each with its count
US terms throughout. Every row below ends with the count that round finishes on.
| Part | Qty | Finishes on |
|---|---|---|
| Main Body Panels | 2 | - |
| Sleeves (Granny Stitch) | 2 | - |
| Sleeve Cuff | 2 | - |
| Turtleneck | 1 | - |
| Bottom Brim | 1 | - |
Change color before completing last stitch for a clean transition.
| Round | Instruction | Count |
|---|---|---|
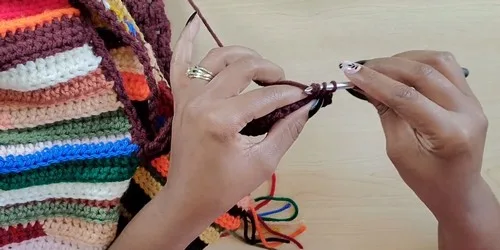
| Round 1 | Chain 73 for foundation. Work HDC in back bump of second chain and across. (72 hdc) | - |
| Round 2 | Chain 2, turn, work HDC-BLO across. Work last stitch through both loops to secure edge. | - |
| Round 3 | +: Continue repeating Row 2, changing colors as desired, until panel measures approximately 21 in wide x 20 in long. | - |
| Round | Instruction | Count |
|---|---|---|
| Round 1 | Attach yarn to armhole bottom center. Work 1 SC around armhole edge. Slip stitch to join. | - |
| Round 2 | Chain 1, work 3 DC cluster, skip 2 stitches, repeat around. | - |
| Round 3 | +: Chain 1, turn. Work clusters into chain spaces with chain 1 between clusters. Continue rounds until sleeve measures around 14 in. | - |
Fasten off and weave end for a clean finish.
| Round | Instruction | Count |
|---|---|---|
| Round 1 | Chain 1, SC into each DC, skipping chain spaces. Slip stitch to join. | - |
| Round 2 | Chain 1, work SC decrease over each stitch. Slip stitch to join. | - |
| Round 3 | Chain 1, repeat decrease rounds as needed for cuff size. | - |
| Round 4 | Chain 2, DC in each stitch. Repeat for 6 rows. | - |
| Round | Instruction | Count |
|---|---|---|
| Round 1 | Attach yarn at shoulder seam. Work SC evenly around neck opening. Slip stitch to join. | - |
| Round 2 | Chain 26 for ribbing height. Skip first chain, HDC in back bumps across. | - |
| Round 3 | Slip stitch into next SC on neck edge twice, chain 1, turn. HDC-BLO across with last stitch through both loops. | - |
| Round 4 | +: Repeat joining rows around neck until complete. | - |
Fasten off and weave ends.
| Round | Instruction | Count |
|---|---|---|
| Round 1 | Attach yarn to bottom edge. SC around evenly. Slip stitch to join. | - |
| Round 2 | Chain 2, DC around forming base round. | - |
| Round 3-5 | Chain 2, work 3 FPDC then 3 BPDC repeating sequence, maintaining FPDC over FPDC and BPDC over BPDC. (5 rounds total) | - |
03 · Putting it togetherHow the pieces go together
- S1
Place panels together with right sides facing in.
- S2
Use stitch markers to secure edges.
- S3
Slip stitch or sew up both sides, leaving 8 in armhole opening.
- S4
Sew shoulder seams across 16 rows on each side, leaving center for neck.
- S5
Seam rib ends together using slip stitches.
04 · Before it goes to a childWhat has to be right, and what is allowed to drift
- Block or steam your two body panels before seaming so both measure as close to 21 x 20 inches as possible — this makes side seaming and shoulder alignment much easier.
- Use stitch markers generously when pinning the panels right-sides-together; it prevents the classic problem of one side stretching longer than the other while seaming.
- When working the granny stitch sleeves, keep your chain-1 spaces consistent between clusters so the sleeve rounds stack evenly and don't spiral.
- The sleeve cuff's decrease rounds can tighten up quickly, so try the cuff against your wrist periodically rather than waiting until the end to check fit.
- Leave the full 8-inch armhole opening as instructed when seaming the sides — this space is what allows the sleeves to be set in without puckering.
- Weave in ends as you finish each part rather than saving them all for the end; with this many color changes on the body panels, loose ends can pile up fast.
05 · Snag listWhat went wrong on the bench, and the fix
Snag 1
Working into both loops instead of the back loop only on the body panel rows.
Double-check you're inserting your hook under just the back loop of each HDC stitch to keep that ribbed texture consistent across every row.
Snag 2
Losing track of the last stitch instruction on the body panels.
Remember the last stitch of each row is worked through both loops to secure the edge — skipping this can leave a loose, unstable border.
Snag 3
Miscounting stitches when skipping two stitches between granny clusters on the sleeves.
Use a stitch marker every few clusters to keep your count honest and prevent the sleeve from drifting out of round.
Snag 4
Rushing the cuff decrease rounds and losing the sleeve's shape.
Work the SC decreases evenly around rather than clustering them in one spot, so the cuff tapers smoothly instead of puckering.
Snag 5
Seaming the shoulder seams before checking the neck opening fits.
Try the sweater on (or measure against a similar sweater) before fully seaming the 16 rows on each shoulder, leaving enough center space for the head to pass through comfortably.
06 · QueriesQuestions logged against this build
What size will this turtleneck sweater turn out?
Each body panel measures about 21 inches wide by 20 inches long, giving a relaxed, oversized fit once both panels are seamed together. You can adjust the foundation chain length or row count on the panels to size it up or down.
Why does the pattern use back loop only on the body panels?
Working HDC in the back loop only creates that distinctive ribbed, knit-like texture that gives the sweater its chunky, cozy look. It also makes color changes between rows look extra clean along the ridge lines.
How do I keep the granny stitch sleeves from twisting?
Keep your chain-1 spaces between clusters even and use a stitch marker at the start of each round so you always know where your round begins. Consistent tension on your DC clusters also helps the sleeve stack straight instead of spiraling.
Is this pattern good for a first garment project?
It's a great next step after amigurumi or accessories since the shaping is simple — two flat panels, two sleeves, a collar, and a brim — but it does involve seaming and post stitches, so basic comfort with reading crochet patterns is helpful.
Original pattern: https://crocheteverything.com/free-crochet-turtleneck-sweater-pattern-chunky-style-for-fall-and-winter/
07 · Made byWho counted this one

Who writes Amigurumi Addict, how a build gets its number, and why every round on the site carries a stitch count.
08 · Next off the benchThree builds that sit near this one

Odds and ends
Crochet a phone bag with strap, flap, and ring closure
How to crochet a phone bag? Join rounds from a 30-chain base, add a strap, flap, and ring.

Odds and ends
Crochet worsted weight socks with a turned heel
How do you crochet socks for winter? Build toe-up in worsted weight with a folded heel and ribbed leg.

Odds and ends
Toe-Up Woodland Walker Crochet Socks With Colorwork Cuff
How do you crochet toe-up socks with a colorwork cuff? Build the Toe, Heel, and stranded Cuff in order.
Join the build log
One message when a build is issued
A drawing and its parts list, when one leaves the bench.