| Shelf | Level | Time | Hook | Yarn |
|---|---|---|---|---|
| Odds and ends | Beginner | 3-5 hours | 2 mm | DK (Weight 2) |
Beginner crochet pouch with button closure
How do you crochet a small button pouch? Chain 50, curve the ends, seam the sides, add a buttonhole.
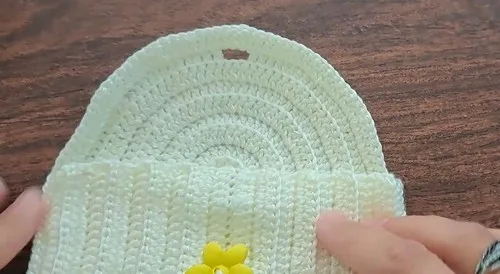
01 · The pieceWhat Beginner crochet pouch with button closure actually is
The pouch is a single flat piece before it becomes a container: a foundation chain of 50 stitches worked into the Base and Body, curved at one end with six double crochets doubled to twelve, then carried up through the Body Rows worked in back loops only. A Buttonhole breaks the straight edge at Row 8. What actually holds the finished shape is not the stitch pattern but the assembly step — folding the flat rectangle in half and seaming the two open sides, with the button set opposite the hole to close the flap.
Stitch counts matter at the curve: the 6-into-1 increase, doubled to 12 stitches in the following row, sets the radius of the pouch's rounded end, and dropping a stitch there skews the whole base. The 49 straight stitches per side need to stay consistent so the two edges seam evenly. Where precision loosens: hook size, yarn color, button diameter, and how many extra rows are worked at Body Rows before the Buttonhole — none of these affect whether the pouch closes, only how large it ends up.
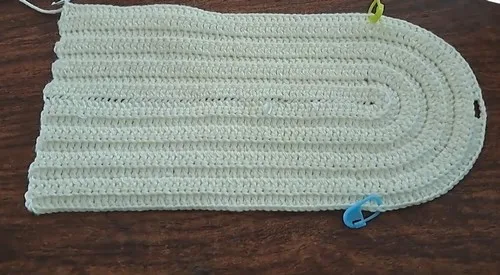
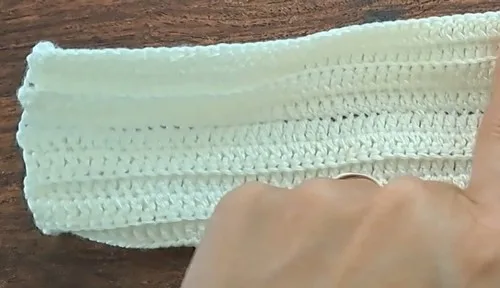
02 · The count run5 rounds across 4 parts, each with its count
US terms throughout. Every row below ends with the count that round finishes on.
| Part | Qty | Finishes on |
|---|---|---|
| Base and Body | 1 | - |
| Body Rows | 1 | - |
| Buttonhole | 1 | - |
| Final Row | 1 | - |
Initial Chain: Chain 50.
| Round | Instruction | Count |
|---|---|---|
| Round 1 | Chain 2. Double crochet into the 3rd chain from hook. Double crochet in each chain (49 total).In the last chain, place 6 double crochets to curve around. Continue with 49 double crochets on the opposite side. Place stitch markers at first and last double crochets of the row. | - |
| Round | Instruction | Count |
|---|---|---|
| Round 2 | Chain 2 and turn. Double crochet in the back loops only for the next 49 stitches.At the marker, double crochet twice into each of the 6 curved stitches (12 total). Continue 49 double crochets (back loops only). | - |
| Rounds 3–7 | Repeat Row 2, increasing at the curve stitches as instructed. Maintain back loop only for all straight stitches. | - |
| Round | Instruction | Count |
|---|---|---|
| Round 8 | Work established pattern until desired buttonhole location. Chain 4 and skip 3 stitches to create the hole.Continue row as normal. | - |
| Round | Instruction | Count |
|---|---|---|
| Round 9 | Continue in pattern to complete the body after buttonhole row. | - |
Techniques on this build
- Turning chain into stitch
- Row 1 starts with double crochet into the 3rd chain from hook; skip too few or too many chains here and the 49-stitch count drifts before the curve is even reached.
- Multiple stitches into one stitch (curve increase)
- Six double crochets fill the last chain of the foundation, then each is doubled to 12 in the next row; this is what turns a flat strip into a rounded pouch end.
- Back loop only double crochet
- Used across all straight stitches in the Body Rows; working into both loops by mistake erases the ridge line and stiffens the fabric.
- Chain-space buttonhole
- Row 8 chains 4 and skips 3 stitches mid-row; the gap needs to land at the flap edge, not partway down the side seam.
Final fit-up
- Weave in the tail from the foundation chain and any joins along the seam edges before assembly, since they become inaccessible once the sides are closed.
- Fold the pouch and align the two straight sides, matching row for row so the back-loop ridges line up.
- Sew or slip stitch the sides closed, then turn the pouch right side out through the open top.
- Attach the button on the side opposite the buttonhole, positioned to align with the Row 8 gap when the flap is folded down.
How the parts fit
- The curve increase (6 double crochets into the last chain, doubled to 12 in the next row) does the work a separate round would otherwise do — it turns a flat strip around a corner without breaking the yarn or changing rows.
- The Body Rows are worked flat and back-and-forth rather than in the round, which is why the piece needs a fold-and-seam step at assembly; the two straight 49-stitch edges only become a tube once sewn together.
- Stitch markers at the first and last double crochets flag the boundary between the 49 straight stitches and the 12 curved stitches, a distinction that matters every row since the curve stitches are worked through both loops while the straight stitches are worked through the back loop only.
Scaling the build
| Smaller | Use a finer yarn and a smaller hook; the fabric tightens and the same 49-stitch sides and 12-stitch curve yield a more compact pouch. |
|---|---|
| Taller | Repeat the Body Rows pattern additional times before working the Buttonhole row; this adds height to the body without changing the 49-stitch width or the 12-stitch curve count. |
03 · Putting it togetherHow the pieces go together
- S1
Fold pouch and align sides.
- S2
Sew or slip stitch the sides closed.
- S3
Turn the pouch inside out.
- S4
Attach the button on the opposite side of the buttonhole.
04 · Snag listWhat went wrong on the bench, and the fix
Snag 1
Working both loops on straight stitches
Check for the horizontal ridge line after each row; if it's missing, the back loop only instruction was skipped and the row should be frogged and reworked.
Snag 2
Miscounting curve stitches at 6 or 12
Count stitches between the two stitch markers immediately after placing the curve increases, before continuing to the next straight section.
Snag 3
Buttonhole gap too loose or tight
Test the button against the chain-4, skip-3 gap before starting Row 8; if it slips through, choose a slightly larger button rather than altering the chain count and disrupting the row total.
Snag 4
Skipping the 3rd-chain start on Row 1
Recount the 49 stitches right after Row 1 is complete; starting in the wrong chain shifts every stitch count for the rest of the piece.
05 · QueriesQuestions logged against this build
What does working in the back loops only do for this pouch?
It leaves a row of unworked front loops across every stitch, which builds a subtle horizontal ridge down the body. It also keeps the fabric slightly stretchier, useful for pushing small items like earbuds or coins in and out.
Why does Row 1 place six double crochets in the last chain?
That cluster turns the flat foundation chain around a corner instead of coming to a sharp point. Doubled to 12 stitches in the following row, it becomes the rounded end of the pouch's Base and Body.
Where exactly does the buttonhole go?
It's worked in Row 8, once the established pattern reaches the desired location on the flap edge. Chain 4, skip 3 stitches, then continue the row as normal so the gap sits centered for the button.
06 · Made byWho counted this one

Who writes Amigurumi Addict, how a build gets its number, and why every round on the site carries a stitch count.
07 · Next off the benchThree builds that sit near this one

Odds and ends
Crochet a phone bag with strap, flap, and ring closure
How to crochet a phone bag? Join rounds from a 30-chain base, add a strap, flap, and ring.

Odds and ends
Crochet worsted weight socks with a turned heel
How do you crochet socks for winter? Build toe-up in worsted weight with a folded heel and ribbed leg.

Odds and ends
Toe-Up Woodland Walker Crochet Socks With Colorwork Cuff
How do you crochet toe-up socks with a colorwork cuff? Build the Toe, Heel, and stranded Cuff in order.
Join the build log
One message when a build is issued
A drawing and its parts list, when one leaves the bench.